water colour tips and tricks
7 Watercolor Tips for Beginnersclick here for more details

If you're looking to get started with watercolor or improve your techniques, check out this list of 7 tips and basics. Watercolor is a fun and sometimes unpredictable medium. With the amount of ways to use it, this could be a really long list, but we've boiled it down to the top 7 basics to get your started.
1. PROPER ART MATERIALS
Having the right tools in your toolkit makes a world of difference. Using quality materials is essential to give you results you'll be happy with. Poor quality materials often just plain don't work and cause frustration, wasted time, and wasted money. It may also deter you from wanting to continue painting as the results just won't be the same as if you use quality materials. Lets break it down by paper, paints, and brushes:
Paper:
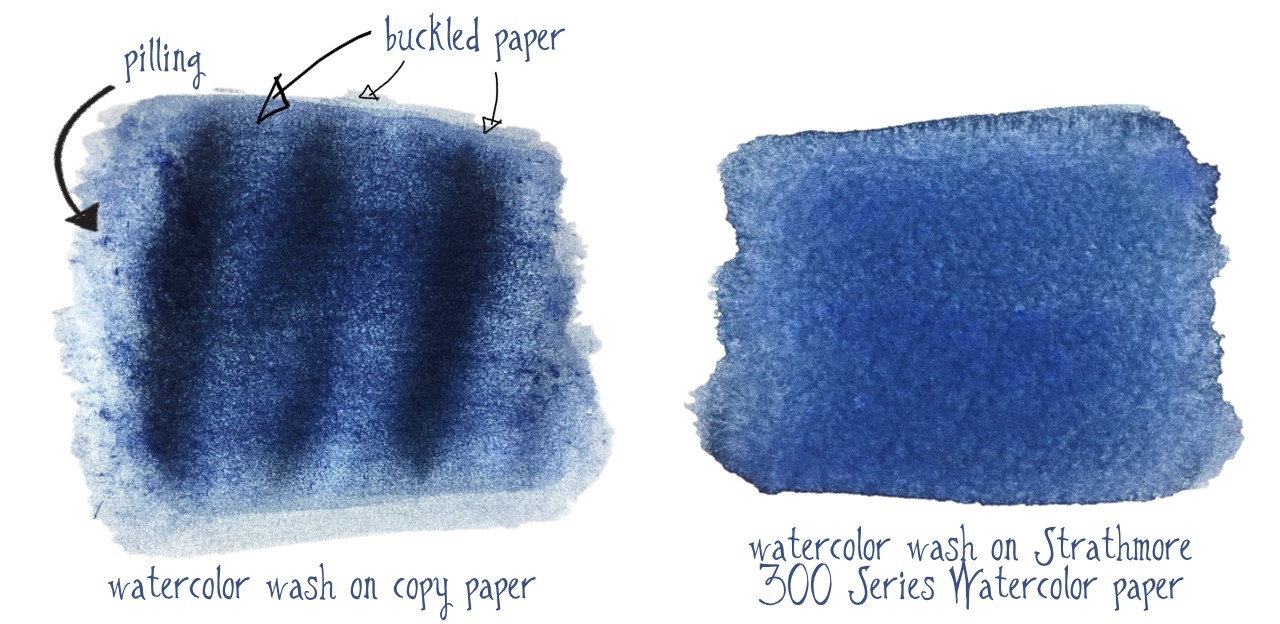
Not all paper is created equally! If you're going to watercolor, it is essential that you use actual watercolor paper. Below is a comparison of a watercolor wash on regular copy paper, and another on watercolor paper with the same paint mix. The copy paper isn't made in the same way as watercolor paper and results in a buckled, wavy wash. The copy paper also pills, meaning the fibers start to tear and ball up on the sheet. The watercolor paper is heavier weight and is made with additives called "sizing" that allows it to absorb moisture in the proper way. It remains flat, has an even color tone, and doesn't pill or tear.

In general, we recommend a watercolor paper that has a weight of 140lb. (300gsm). Our 300 Series Watercolor paper is a great, economical place to start that will let you practice, experiment and create beautiful work.
Paint:
Watercolor paint comes in both tubes and pans. Either works depending on your preferences, but making sure to use quality brands makes a difference. Low quality paint can become crackly and chalky versus having smooth, even color. Brushes:
You don't need to start with a huge assortment of brushes, but a few key types will help as you try to achieve different results. A small, medium and large round brush, a flat brush, and a mop brush is a great way to start. Each brush is created for an intended purpose. Check out Princeton Artist Brush's page to get a good idea of the types of brushes available and what each does.

2. WORK FROM LIGHT TO DARK
With watercolor it's important to lay down your light colors first and work towards the darker colors. Have patience - there's no rush. We start with the light colors first because once you lay down the dark colors, it's hard to undo. Due to the transparency of watercolor, your light colors won't show if they're covered up by dark colors. Also, the white and light areas of your painting are coming from the paper, so plan ahead and keep in mind which areas you want to keep white. Masking fluid is a great way to reserve areas of white on your painting.
 Artwork by Steve Mitchell. Follow along to the tutorial here.
3. WATER TO PAINT RATIO
The water to paint ratio will change depending on what you're trying to achieve.
Too much water can result in colors that are too light. It can also make paint spread more than you'd like and cause colors to mix and become muddy.
Too little water can result in thick colors that don't flow or lay down properly, or cause visibly streaky brush strokes.
A general rule of thumb is to always keep A LOT of water on hand and a palette for mixing paints. Use the palette to mix your colors and add the appropriate amount of water. Check the color saturation on a scratch piece of paper to see if more color or more water needs to be added before painting on your piece. Always make sure to wash your brush well between colors so you don't get muddy mixes.
4. WET ON DRY TECHNIQUE VS. WET ON WET TECHNIQUE
There are many techniques you can use while watercolor painting, but here are two basic techniques that will give you different result depending on what you're going for:
Wet on dry: applying wet paint onto dry paper, or wet paint onto an area of dry paint. This technique allows for more control and crisp, defined edges. The paint will only go where your brush takes it.
Wet on wet: wet paint is applied to wet paper, or added to a wash of fresh paint. This creates a fluid, fun and unpredictable effect. There is less control with a wet on wet technique. To try it, lay down clean water on the paper, then add watercolor paint to the wet areas. You'll see the paint flows to the wet areas.
5. DRY-TIME
Dry-time varies depending on what you're trying to achieve in your painting. If you want colors to blend and bleed into each other, you can apply layers on top of wet paint. Be careful not to over-layer with wet paints because the colors could easily become muddy.
If you want to add new color layers and details over the top of a base you've laid down, be patient and make sure the layer underneath is dry first, or the colors will run into one another and you wont have defined edges and shapes. It takes time, patience and practice.
Below is an example of adding the same magenta color on top of the same yellow cover. In the top example, the yellow paint is still wet when the magenta is added, allowing colors to mix and blend. On the bottom, the yellow paint is already dry so the magenta becomes a second layer with a crisp line. Both techniques work well for different types of outcomes.
*TIP: you can use a hair dryer to speed up dry-time between layers.
6. MIXING PAINTS
There is a lot of planning and preparing in watercolor painting. A good rule of thumb is to always mix more paint than you think you'll need on your palette. If you run out of a color, it can be really difficult to mix the exact same shade again, so you want to be prepared.
7. OTHER ESSENTIAL SUPPLIES AND SETTING UP YOUR WORK SPACE
If you do the work to prepare for painting prior to getting started, the process will be a lot easier.
Paper towels are going to be one of your best friends on your watercolor painting journey, so keep plenty on hand. You'll use it to clean your brush, dab your brush, and dab the paper as you work.
A painting palette is essential for watercolor painting so you can mix colors, add water, and get the right mix before applying paint to your paper.
Scratch paper is helpful to test your shades and water-to-paint ratio before moving to your final piece.
Masking or painter tape is a great tool to use to tape off your borders and make clean edges to frame your painting. Make sure your edges are sealed tightly so paint doesn't seep through.
Comments
Post a Comment